Write-Up
Backup Stack Design, Installation & Configuration
04/10/2026
Purpose
The goal is to reduce the probability of permanent data loss as much as reasonably possible while maintaining practicality and functionality.
Design
I will rely on Git for version control, followed by a local backup and finally a remote backup.
For version control, I will use Git for data for which I want to maintain a history of changes, such as my projects, book library, and Obsidian vault. I have already been using Git for some time, and I do not see a reason to switch to another solution since Git already fulfils this role effectively.
For local backups, Git alone is not sufficient protection against system failure or other forms of data loss. I will therefore configure automatic backups of crucial data to an external drive using Borg and Python. This will provide a separate copy of the data that is independent of the primary filesystem.
Finally, for additional protection, I will maintain another backup at a remote location using Proton Drive. Since I already have a Proton subscription, Proton Drive is a natural choice for my current setup. However, once I set up my NAS as part of my networking project, I will evaluate whether hosting the remote backup on my own infrastructure is worthwhile.
I also considered using system snapshots as part of the backup strategy. However, I decided not to configure them for now because I expect to reinstall and reconfigure Arch Linux multiple times while working towards the requirements of my Linux workstation project. Once the workstation configuration becomes more stable, I intend to use Timeshift for system snapshots.
Installation
Git
Since I am using Arch Linux, I will use its pacman package manager to install Git:
sudo pacman -S gitTo verify that Git was installed correctly, I can run:
git --versionIf the installation was successful, this will return the installed Git version.
Borg
The same process of installation and verification as Git:
sudo pacman -S borgProton-Drive-CLI
The Proton Drive CLI is not available as a package in the Arch Linux repositories, so I will follow the official documentation to install it manually.
There are two ways to do this:
1. Build from source
The first option is to build the CLI from source. The CLI is built using Bun, so I first need to install the Bun package manager and runtime:
sudo pacman -S bunI then download the Proton Drive repository:
git clone https://github.com/ProtonDriveApps/sdk.gitI navigate to the CLI directory:
cd sdk/cliFrom this directory, I can install the required dependencies and build the CLI with Bun:
bun install
bun run build
This produces a standalone executable at:
release/proton-drive2. Use the provided binary
The second option is to use one of the pre-built binaries provided by Proton. For Linux x64, Proton provides a linux/x64 build. If this build crashes at startup with an Illegal instruction error, Proton recommends using the linux/x64-baseline build instead.
After downloading the binary, I need to give it execute permission. I can do this by navigating to the directory containing the binary and running:
chmod +x proton-driveI can then move the binary to ~/.local/bin, which allows me to execute it from any directory:
mv proton-drive ~/.local/bin/To verify that the installation was successful, I can run:

Python
sudo pacman -S pythonConfiguration
Version Control for Frequently Changed Crucial Data
1. Initialise a Git repository
Since I already use Git for version control of my Obsidian Vault, Book Library, and Music Library, I wanted to document the process of creating a Git repository rather than simply using an existing repository.
After navigating to the Downloads directory, I initialise a new Git repository with:

Python
This creates a hidden .git directory inside Downloads. The .git directory contains the repository’s metadata and version-control history.
At this point, the repository is empty because no files have been committed yet.
2. Stage the files
Before creating the first commit, Git needs to know which files should be included in the commit.
I use:
git add .The . tells Git to stage all files and directories within the current directory.
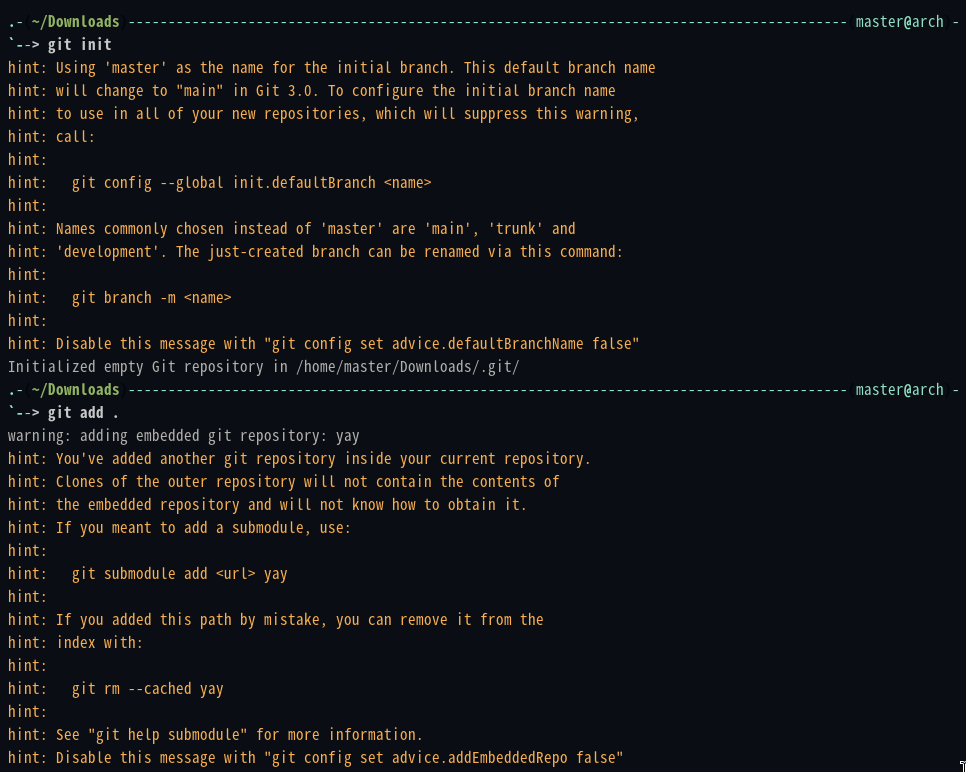
Git reported the following warning:
warning: adding embedded git repository: yayThis occurred because the yay directory in Downloads contains its own .git directory and is therefore already a separate Git repository.
3. Create the initial commit
Once the required files have been staged, I can check what Git is about to commit:
git statusAfter confirming that the correct files have been staged, I create the first commit:

A commit records a snapshot of the staged files at a particular point in time. This gives me a point in the repository’s history that I can later inspect or return to.
4. Verify the commit history
Finally, I verify that the commit was successfully added to the repository’s history:
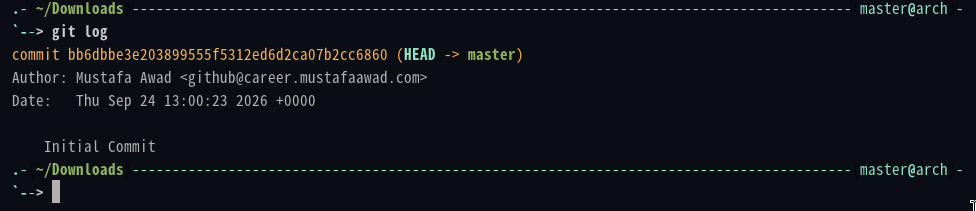
This displays information about the commit, including its commit hash, author, date, and commit message.
At this point, the repository has been initialised and contains its first recorded snapshot.
5. Create a Script to Automate the Process
Now that the manual process works, the next step is to automate it with Python.
The script will:
- Stage all changes in the repository.
- Check whether anything has actually changed.
- Create a commit if changes are present.
- Use the current date and time as the commit message.
- Do nothing if the working tree is already clean.
I saved the script in my personal scripts directory as:
~/.scripts/git_backup_script.pyPython Script
#!/usr/bin/env python3

# Import subprocess to allow Python to run external commands such as Git
import subprocess

# Import datetime to retrieve and format the current date and time
from datetime import datetime

# 1. Assign a variable for the repository path
repo = "/home/master/Downloads"

# 2. Run "git add ." to stage all changes in the repository
subprocess.run(["git", "-C", repo, "add", "."], check=True)

# 3. Check the staging area for differences from the latest commit
result = subprocess.run(
    ["git", "-C", repo, "diff", "--cached", "--quiet"]
)

# 4. Test the result: if there are no staged changes, print a message;
# otherwise, create a commit with the current date and time
if result.returncode == 0:
    print("No changes to commit.")
else:
    message = f"Automated backup: {datetime.now():%Y-%m-%d %H:%M:%S}"

    subprocess.run(
        ["git", "-C", repo, "commit", "-m", message],
        check=True
    )

    print(f"Committed: {message}")
The -C option tells Git which repository to operate on, allowing the script to execute the commands without first changing the current working directory.
Making the Script Executable
Before testing the script, I needed to make it executable.
cd ~/.scripts
chmod +x git_backup_script.py
I then verified the permissions:
ls -l git_backup_script.pyThe output showed the executable permission:

The x characters indicate that the file has execute permissions.
Testing the Script
I first created a new file in the repository to give Git something to detect.
cd ~/Downloads
touch test_file.txt
I then checked the repository:
git statusGit reported the new file as untracked:
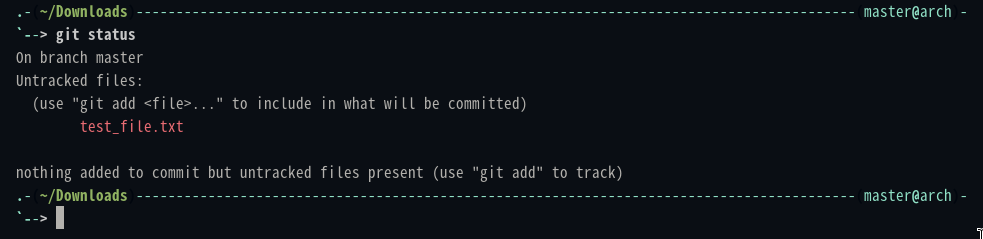
This confirmed that there was a change for the script to process.
First execution attempt
I initially ran the script directly:
~/.scripts/git_backup_script.pyHowever, it failed with errors such as:
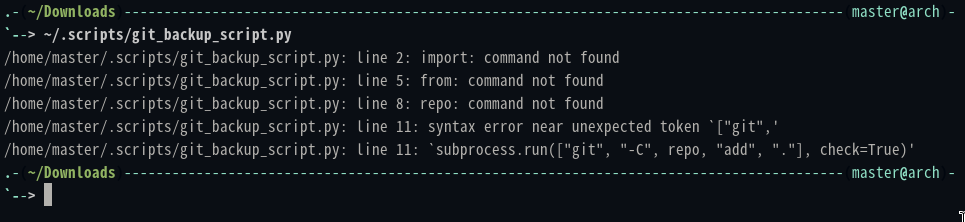
The problem was not the Python code itself. The operating system was attempting to execute the file as a shell script.
Linux does not determine how to execute a script simply from its .py extension like in Windows. When a script is executed directly, the shebang on the first line tells the system which interpreter should be used.
I therefore added the following line to the beginning of the script:
#!/usr/bin/env python3This tells the system to execute the file using python3.
After adding the shebang, I ran the script again:

This time it executed successfully.
Verifying the Commit
I then checked the Git history:
git logThe new commit appeared at the top of the repository:
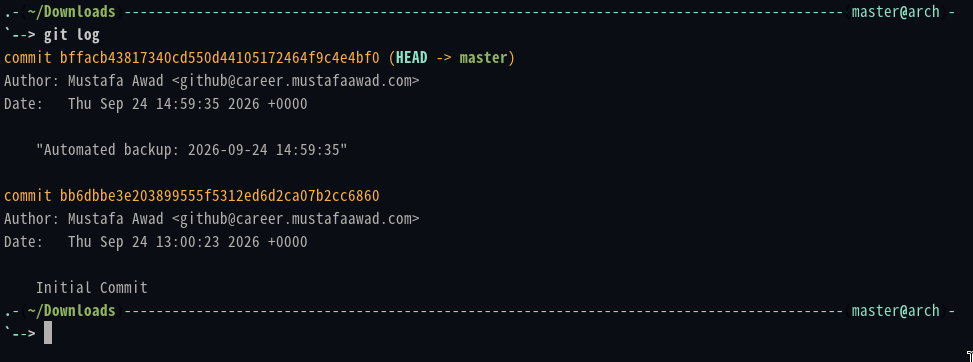
This confirmed that the script successfully detected the change and created a commit with the current timestamp.
Testing the No-Changes Scenario
I also needed to test the other possible outcome: running the script when there are no changes to commit.
First, I checked the repository:
git statusI then ran the script again:
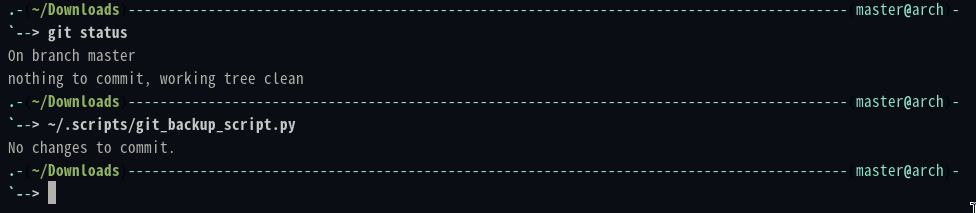
This confirmed that the script handles both situations correctly:
- Changes exist: stage them and create a timestamped commit.
- No changes exist: do not create an unnecessary commit.
6. Schedule an Event to Run the Script
We will use Cron to schedule the script because it is sufficient for this simple task.
First, we need to create or edit our user’s crontab:
crontab -eWhen I initially ran this command, I received the following error:

The first line is not an error. It simply means that I did not have a crontab yet, so cron was preparing an empty one.
The actual problem was that crontab was configured to use vi as its text editor, but vi was not installed on my system. The command therefore failed with exit status 127, which indicates that the required command could not be found.
Since I use Neovim, I specified it as the editor for this command:
EDITOR=nvim crontab -eThis opened the empty crontab in Neovim, where I added the following entry:
# minute / hour / day of month / month / day of week / script path
0 20 * * * /home/master/.scripts/git_backup_script.py
The schedule can be broken down as follows:
The five fields represent the minute, hour, day of the month, month, and day of the week, respectively. The * character means any valid value for that field. Therefore, 0 20 * * * means that the script will run at minute 0 of hour 20, every day of the month, every month, and every day of the week. In other words, the script will run every day at 20:00 (8:00 PM).
I then saved and exited Neovim and verified that the scheduled job had been added:
crontab -lThe output showed:

This confirms that the cron job is registered and scheduled to execute the script every day at 8 PM.
However, the script did not run at the specified time, so I suspected that the cronie service was not running. I checked its status with:

This confirmed that cronie was not currently running and was also disabled from starting automatically with the system. I enabled and started the service with:
sudo systemctl enable --now cronieenable configures cronie to start automatically at boot, while --now starts the service immediately.
Locally Automated Backup for Crucial Data
1. Initiate a repository for Borg backups
Borg requires a repository where the backup archives will be stored. I chose to store the repository on my external drive:

Here, --encryption=none specifies that Borg should not encrypt the repository, while /mnt/external\ drive/backup_repository is the location where the repository will be created.
2. Create a manual backup
For this step, I will create a manual backup of my Downloads directory. Each archive will use the name workstation followed by the date of creation. The date allows individual archives to be distinguished when selecting a specific backup.
borg create /mnt/external\ drive/backup_repository::workstation-{now:%Y-%m-%d} ~/DownloadsThis creates an archive in the Borg repository using the workstation-YYYY-MM-DD naming format and backs up the contents of ~/Downloads.
3. Verifying the contents of an archive
To inspect the contents of a backup without extracting it, I can use borg list and specify the repository and archive:
borg list /mnt/external\ drive/backup_repository::workstation-2026-10-02This displays the files and directories stored within the selected archive.
4. Restoring an archive
To test the restoration process without affecting my existing files, I can first create a temporary directory and extract the archive there:
mkdir ~/borg-test
cd ~/borg-test
borg extract /mnt/external\ drive/backup_repository::workstation-2026-10-02
Because Borg extracts the archive relative to the current working directory, the restored files will be placed inside ~/borg-test while maintaining their directory structure.
If I instead want to restore the files to their original filesystem locations, I can extract the archive from the root directory:
cd /
sudo borg extract /mnt/external\ drive/backup_repository::workstation-2026-10-02
Borg will recreate the paths stored in the archive, placing the files back in their original locations.
Note: Restoring directly to the original locations can overwrite existing files. Testing the restoration in a temporary directory first provides a safer way to verify that the backup can be successfully restored.
5. Autmating Backups
As I did with Git, I will use Python to create a script that runs the Borg backup command. Each time the script runs, it will create a new archive using the current date and time as part of the archive name.
I will use Cronie to schedule the script so that the backup runs automatically at a specified time.
Although Borg provides tools for managing old archives, such as borg prune, I will not implement an automated retention policy in this project. The repository currently has sufficient available storage for the scope of this project, so automated deletion of older backups is not necessary at this stage.
Python Script:
#!/usr/bin/env python3

import subprocess

repository = "/mnt/external_drive/backup_repository"
source = "/home/master/Downloads"

result = subprocess.run([
    "borg",
    "create",
    f"{repository}::workstation_{{now:%Y-%m-%d_%H-%M}}",
    source
])

if result.returncode == 0:
    print("Backup completed successfully.")
else:
    print("Backup failed.")
The script uses Python’s subprocess module to execute borg create. The return code is then checked to determine whether the backup completed successfully.
Making the Script Executable
Before testing the script, I need to make it executable.
cd ~/.scripts
chmod +x borg_backup_script.py
I then verify the permissions:
ls -l borg_backup_script.pyTest the Script
Run the script using the following command:
~/.scripts/borg_backup_script.pyInitially, I encountered the following error:

I quickly noticed that I had accidentally added an extra : to the shebang line. I removed it and ran the script again.
This time, I encountered a different error:

This happened because I was using a Python formatted string literal (f-string). Python interpreted {now:%Y-%m-%d} as a Python expression and tried to find a variable called now. However, {now:%Y-%m-%d} is actually a Borg placeholder that Borg needs to process.
To pass the placeholder through Python without Python interpreting it, I need to add two extra braces :
f"{repository}::workstation_{{now:%Y-%m-%d_%H-%M}}"After making the changes, I ran the script again. This time, the script completed successfully and returned the message:

To verify that the backup was actually created, I checked the Borg repository using:

This confirms that the script successfully created a backup archive in the Borg repository.
Cron Setup
Cron will be used to schedule the Python backup script.
Before editing the crontab, I need to specify which editor should be used:
EDITOR=nvim crontab -eThis opens the crontab configuration in Neovim.
I then added the following line to schedule the backup:
0 20 * * 0,3 /home/master/.scripts/borg_backup_script.pyThis runs the local backup script at 20:00 every Sunday and Wednesday.
Remote Backup of Crucial Data
1. Authentication
First, I needed to authenticate with my Proton Drive account:
proton-drive auth loginThe CLI then prompts me to complete the authentication process.
Once authenticated, I can remain inside the Proton Drive CLI environment and run its commands directly. This means I do not need to invoke proton-drive before every command.
2. Create a Manual Remote Backup
Once authenticated, I can upload my local Downloads directory to my remote Proton Drive storage using:
filesystem upload ~/Downloads /my-filesThis uploads the Downloads directory to the /my-files directory on Proton Drive.
3. Verify the Backup
To view the contents of the remote /my-files directory, I can use:
filesystem list /my-filesThe output shows the Downloads directory, confirming that it was uploaded successfully.
I can then inspect the contents of the uploaded directory:
filesystem list /my-files/DownloadsThis displays the files contained within my uploaded Downloads directory.
To perform a further verification, I can download the uploaded directory back to my local system:
filesystem download /my-files/Downloads /home/master/temporaryOnce the download has completed, I can check ~/temporary to verify that the files were successfully transferred back to the local system.
Conclusion & Evaluation
The objective of this project was to reduce the risk of permanent data loss while keeping the backup system practical. I achieved this by implementing Git for version control, Borg for local backups and Proton Drive for remote storage.
During the project, I learned how to properly back up data using different methods, create Python scripts to automate tasks and schedule those scripts to run automatically. I also learned how Borg and the Proton Drive CLI can be used to create and restore backups. This gave me a better understanding of how to build a backup system rather than relying on a single method of protecting data.
I decided not to automate the Proton Drive backup because the current level of automation is sufficient for my needs. Instead, I want to use the configuration in practice and identify what needs to be improved before adding further complexity.
There are still areas that I intend to develop. In particular, I will implement a retention policy for Borg at a later stage and consider Timeshift once the workstation configuration becomes more stable. I also want to continue using the current backup system before making further changes so that I can develop it into a more mature and reliable configuration based on actual use.
Overall, the project has achieved its current objective and provides a working foundation that I can continue to develop as my Linux workstation project progresses.
References
-
Proton Drive CLI Documentation
Proton Drive CLI – GitHub Documentation -
Proton Support – Proton Drive CLI
Proton Drive CLI – Proton Support -
Arch Linux Wiki – Git
Git – Arch Linux Wiki -
Arch Linux Wiki – Borg
Borg – Arch Linux Wiki -
Arch Linux Wiki – Cron
Cron – Arch Linux Wiki -
Python Documentation – subprocess
Python subprocess documentation -
BorgBackup Documentation
BorgBackup Documentation